There are more tips for beginning canners than you can imagine. I am going to provide you with just a few but please do your research the best place to do this is the National Center for Home Preservation. I am and have been canning and preserving food for over 25 years. I still error on the side of caution.

There are many recipes here and other sites. We do not promote or advertise any sites or products. These are your personal choices. When I started I used a pasta pot to water bath, a washcloth to keep the jars in place and a pair of tongs to get my jars out. We do what we can safely. Since then I have bought many products many are for crap and many still shine. My first water bath canner is now a pot outside for plants!
Once you have your recipe you need to make sure you get all your supplies gathered to start this new adventure. Gathering everything to this day is the best thing you can do for your process. Having to search for a product or tool is a pain and looses good time. We want a smooth process always.
Pick fruit/vegetable's that are fresh. Fresh is best !

Warm up the water with your jars in the pot. No lids needed when warming your jars. This will sanitize the jars. Also, you want your jars warm when you fill them. So leave them in there until your recipe is ready.
You have a twist ring and lid for each jar. Back in the day they required that you have those lids (not the ring) warmed up to get a better seal.
I still do this and recommend that you do this to.
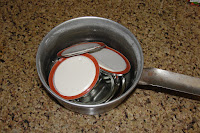 They still require the lids be warm according to the NCHP site. I do this by taking a small sauce pan and just prior to filling the jars I will take some of the warm water from the water bath. Once I fill the small pot I add the amount of lids I need and they are warm and ready for the jars. I then put that water back in the water bath, Why wait.
Now you are ready to make your recipe. I will clean and prepare all my product so that all I need to do is put it all in my pot and get it ready to be canned. Many recipes require many steps so read it carefully and follow the directions. You can always check more than one site to compare and pick what is your best choice.
Once your recipe is finished you are ready to fill your jars.
Your jars should be warm and ready in the water bath. Take each jar out of the water bath. The water in the jars should emptied into the water bath. You will place your jars on a towel or counter cloth. This will protect he counter and keep it clean and give the jars a nice place to land.

Now fill your warm jars with warm product. You should leave at least 1/4" to a 1/2" of head space (Note the Recipe) Once filled wipe the rims of every jar with a clean towel. Apply the lids and twist. Twist the jar closed taunt but not so tight you can not open it once processed.

Return the burner to high and bring the pot back to a full boil. This is when the time starts Set your timer for the amount of time indicated i the recipe. Usually a 10 to 12 minutes average.

Once the time has passed turn off the burner. I let my jars sit for just about 5 minutes. The water is super hot and it does give the jars a bit of time to settle.

Have a towel lined counter or area to put your jars. You will hear that lovely pop when they have sealed. The jars are sealed if the lid have concaved. If it has not and you can touch it lightly and it does it is okie dokie. I let my jars cool overnight or at least until they are cool to the touch.
When the jars are completely cooled pick up each jar and remove the twist top. Your jars should have a tight seal the lid should not be able to be removed. Just give it a little push in
the middle of the lid there should not be any give.
Next you want to keep the lid off. Never store your jars with the lids. The jar with the lid removed should be washed so there is no left over residue that an contaminate any food you add this to or use this for. Once the twist is ff and the jar is washed label and date.
There are many website and any ore recipes on the WWW please take caution and use common sense. here is the go to site for myself National Center for Home Food Preservation
How do I sign up to receive your blog via email. When I clicked on the "subscribe to" link below it went to a page of command lines or code or some such.
ReplyDeleteHello Dusty let me work on that . I can preserve anything but computers not so much. Give me this week.
ReplyDelete