Showing posts with label ginger. Show all posts

8.25.2021

Freezing Fresh Ginger


Ginger ... Fresh Ginger is a staple in my pantry. I use it for everything from Hot Tea to Preserved Jams and lets not stop there for cooking it can bring out the best in many dishes. Granted Ginger is a spice that is an acquired taste. A bit bold but great for you and your health. Ginger can be used in so many ways. Fresh, dried, powdered or as an oil or juice. 


The health benefits are endless it is used to aid digestion, reduce nausea and it can help fight the Flu and the common cold and that is only a few purposes. The great flavor and fragrance comes from the gingerol. The gingerol is the main bioactive compound in ginger. Well more on that later. Let's freeze some ginger! 


The first thing you need to do is get some fresh ginger roots. I buy about 2 pounds. I will freeze some, dry some to make a powder and candy some. Let us get started. Buying your ginger in Spring is when you will know it is at its freshest.


To freeze so many of my herbs and stuff I have bought ice cube trays that have little cubes. This ice cube tray makes it so I can freeze 1 teaspoon per cube. That will make it easier when cooking and dropping it in any recipe.


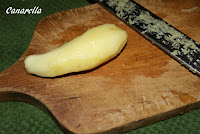
The first thing you will need to do is to peel your ginger. Some times I have used a small paring knife and just thinly sliced the skin off. Another very popular way is to take a spoon and run it down the sides of the ginger this method will peel very well. I also snap the little nobs off the sides and freeze them whole for other uses. I even grate the ginger to dry and make powder. 


Once your ginger is peeled and ready chop it into small little pieces. Once diced have your ice cube tray and a teaspoon available. Also a cup of water. The reason for this is you want to put in one teaspoon of chopped ginger then fill that with water. 


The water will keep it fresh when freezing and the amount of liquid is not enough to make any difference in your jam or cooking. Here is a picture of the ice cube tray filled with the ginger.


Now add the water to the tray.


Once the ginger has frozen you can easily store them in a zip lock bag or canning jar. 

I love having what I need available when ever I need it. 

8.24.2021

Blueberry Ginger Jam


Blueberry Ginger Jam that sounds delicious. I do not ever seem to have a lack of blueberries. The season bring me such a nice amount. This jam is a twin of the Blackberry Ginger Jam we make and this blueberry is our #1 seller. Remember to always freeze fruit when it is in season this way when it is cold and the berry vines are sleeping you have what you need to make jam all year around.


Let us get started with this Blueberry Ginger Jam. My sister Casey came up wit this recipe she was a Ginger Lover.


Ingredients

6 cups of whole blueberries
1/2 cup finely chopped ginger
zest of one lemon
1/4 cup lemon juice
4 to 5 cups of granulated sugar

* Makes approximately 7 half pint jars

Put your blueberries and half of the sugar and the lemon juice into your pot and start this on a low simmer. This will release some of the juices from your fresh blueberries. While they simmer use a potato smasher to crush the blueberries.

Before you start get your ginger cut and ready. 


The easiest way to peel ginger is to use a spoon. Take the spoon holding the bowl of the spoon toward the ginger and scrape in a downward motion. This makes it quite easy to peel.  Ginger is full of fiber so the smaller you can chop the better.


Now chop your ginger into small pieces. They should be small yet able to be seen. The ginger is so delicious in this jam. This picture is only to show you the size. I chop lots of ginger then freeze it for my jams and cooking. But that is another post.


Now that your ginger is chopped add it to the pot stir and then add the the remaining blueberries, sugar and lemon zest. As most of you know we do not use pectin.


I let all my jams gel naturally. Just take it slow and get the mixture up to 223 degrees and that will do it. For now keep this mixture at a simmer and make sure everything is getting along in your pot. The picture will show a larger amount of blueberries then you have prepared but I make double batches. 


If you want to thin out your jam now is the time. I use an immersion blender. Do not go crazy and make it to thin. Although some people do like it that way. 

I like chunky jam that has texture and great taste. 


Now it is time to get your batch up to a good rolling boil this will bring your jam to the right temperature to gel. And to know it use a candy thermometer. You must stay with your jam and stir so it does not stick to the bottom of you pot and burn.


Once your jam is up to temperature turn off the heat and let your jam rest for 5 minutes. This will tell you if the gel is right. Once it has set in the pot for the 5 minutes you will notice when you run your spoon across the top there is a thin layer. It is like when your hot chocolate gets a film on it. That will let you know it is ready to go into the jars. 


Now take your warm jars and fill them until they are about 1/2 inch from the top of the jar. Once filled wipe the top rims of the jars to eliminate any excess jam that may have dripped. The jars need to be clean when you put on the twist and top. Alrighty now that the jars are filled and clean you can top and twist taunt the lids.


Place your jars into a rapidly boiling water bath and let them sit for 12 minutes. Once done turn off the heat let them sit for an additional 5 minutes. Remove your jars place them on a towel on the counter and let them cool for at least 8 hours. Once cooled remove the twist and clean the rim. Label and store for up to one year in a cool dry pantry or cupboard. Never store your preserved food with the twist on. 


11.16.2017

Italian Plum and Pear Jam with Ginger

Italian Prunes it sounds so much better when I say Plum ya think? As you all know the State of Washington sends me stone fruit each year to come up with some new and exciting recipes for this fruit. Well I happened upon this recipe because I have a case of Pear's begging to be jam. And a piece of ginger the size of my Grand-baby's head.These plums are a bit more tart then the California grown.
Yup this later in the season surprise from the Washington Fruit Board was delightful ! Italian Prunes we will call them Plum's.


Ingredients


6 cup clean chopped plums
4 cup clean chopped pears
2 cups sugar
1/4 cup of lemon juice
Fresh Ginger peeled and grated about a half cup (or less to taste)


Start by gathering all those little plum cubes and put them into your pot with the lemon juice. Keep this on a low flame while they cook. You need to soften up the plums to make them better apt to crushing. The longer they cook the softer they become and the more juice will come out of them. It is a beautiful thing jam making. Take your time and enjoy the process.


Next you need to add the pear's so far you have done no smashing. Lets gather all the ingredients together then get to the texture! Stir the pear's into the plums and start to add your ginger . I add it directly into the pot. Also I take a large piece and let it cook with the jam until I am ready to jar up.


As you see I grate the ginger right into the jam !  This is what makes our jam's so delightful the fresh part of it.


Alright by now you have your plums, pear's, ginger and lemon juice in your pot. You should have a glorious color and liquid going by now. This is the time you can put in one cup of your sugar. Make sure it dissolves completely prior to dding the other cup of sugar. Also take the time to smash your fruit mixture to the consistency you like.


I always have my two favorite tools ready and waiting for the jam making . They are my potato smasher and my Immersion Blender.


Now let everything cook to a boil you can not stir down. You want to get your jam to gel. I do this with no pectin and the use of a candy thermometer. I want all my Jam to get to 222-223 degrees to get a good gel. Here is a post on getting your jam to gel. Also a post on Is your jam set? Once it is to the right degrees you need to turn off the flame and let it sit for a few minutes. With most jam this is a smart idea it will help you fruit to not fall or float. Also when it is done cooking give it 5 minutes to rest prior to filling your jar's.

Have your jar's ready. Cover your counter to protect the jar and the counter. Fill your jar's to 1/2 inch from the top. Wipe the rims. Place the lid and twist top . Twist it taunt and put into the boiling water bath for 10 minutes. Once the time is done let them sit for a few minutes and then remove and place on a covered counter for no less than 24 hours. Once done Remove the Twist and wash your jar's.

Label and Store.

Disclaimer: This is not an all inclusive recipe for making jam. You should have a basic knowledge and understanding of the canning process before proceeding. Please consult your local Agricultural Extension Service for additional information. 


7.13.2017

Cherry with Crystallized Ginger Jam

Cherry Ginger Jam I have yet to run out of idea's for the cherries. I received my yearly box from the NW Cherry Growers. Cherry Jam with a nice cup of Crystallized Ginger sounds pretty terrific to me.  The day my box arrives I am so ready. Pa and I sit and anticipate the wonderful Jam's and concoctions we can make from these wonder nuggets. Well I could go on all day but let's get started Jammin'


Ingredients

8 cups of clean, pitted, chopped cherries
1/4 cup fresh lemon juice
2 teaspoons ginger powder
3/4 cup crystallized ginger
2 cups of sugar


Start by putting your cherries and lemon juice in a large non-reactive pot. Stir on a medium heat while smashing your cherries to the consistency you like. I like nice pieces of fruit in my jam's. Keep stirring the cherries keeping the heat at bay so as to not burn or scorch your jam. Never ever ever make jam without having the time and patience to enjoy the process. 


 Now you can add you Ginger Powder one teaspoon at a time making sure it blends into the cherries. Next you can add one cup of the sugar and stir to incorporate well.


This is going to be the time to add the crystallized ginger before you add the last cup of sugar. Stir, stir, stir cha cha cha ! Ok let's add that last cup of sugar and get the jam up to a rolling boil that cab not be stirred down.


You can just see the small little chunks of ginger.


This is going to be Cherrylicious


Now that everything is having a party in our pot we need to get the temperature up to 223. This temperature will bring your jam (most of the time) to a gel point. I put my thermometer into the jam about 10 minutes prior to the water-bath.


How beautiful is this jam. I note that Cherry Jam is one of the deepest colored jam I do. And the flavor is so very rich. Alright it is time to jar up this beauty. Take your warm jar's and full them to a 1/2 inch from the rim of the jar. Wipe the rim of the jars clean and place the top and twist on. Give your jar's a 12 minutes water-bath.


Once they have taken their bath remove the warm jars from the pot and place them on a towel covered counter. Let them cool for 24 hours and then remove the twist clean your jars. Dry your jar and label with type of jam and date you preserved them.. Store them in a cool area.

Disclaimer: This is not an all inclusive recipe for making jam. You should have a basic knowledge and understanding of the canning process before proceeding. Please consult your local Agricultural Extension Service for additional information.

3.08.2016

Blackberry Ginger Jam

Blackberry Ginger Jam that sounds delicious. I do not ever seem to have a lack of blackberries. The season bring me such a nice amount. I always freeze fruit when it is in season this way when it is cold and the berry vines are sleeping I have what I need to make jam all year around.

Let us get started with this Blackberry Ginger Jam. I never had a real love for ginger but have grown quite fond of it since I have learned to adapt it into different recipes. This jam is no exception.


Ingredients

6 cups of whole blackberries
1/4 cup finely chopped ginger
zest of one lemon
1/4 cup lemon juice
4 to 5 cups of granulated sugar

* Makes approximately 7 half pint jars


Before you start get your ginger cut and ready. The easiest way to peel ginger is to use a spoon. Take the spoon holding the bowl of the spoon toward the ginger and scrape. It makes it quite easy to peel. Chop the ginger into small pieces. Ginger is full of fiber so the smaller you can chop the better.


I always like to have everything ready to go when making jam. It makes the whole process so much easier and a more pleasant time.


Get your berries going in a large stainless steel pot. Have your finely chopped ginger and other ingredients ready to mix.


Add your ginger with one cup of sugar and the lemon juice. Bring this up to a rolling boil and then turn the heat down and let it simmer for 15 minutes.

Now add the remaining sugar and get the jam up to a temperature of 223 degrees.


Beautiful color and texture !


Now it is time to turn the flame down and let your jam sit for a few minutes prior to filling your jars Check the jam to see if it is set. This gives you time to get the jars out of the water-bath and scape any foam off the top of the jam.

Ladle the jam into sterilized half-pint jars, wipe the rims, add lids and rings. Process in a boiling-water bath for 10 minutes.


Disclaimer: This is not an all inclusive recipe for making jam. You should have a basic knowledge and understanding of the canning process before proceeding. Please consult your local Center for Home Preservation for additional information and available classes.

6.16.2015

Cherry Jam with Cinnamon & Ginger


Cherry Jam with Ginger and Cinnamon it is almost like pie on toast! Well here is the second in a series of Cherry-licious Jam Recipes. And again let us thank The Washington Fruit Commission and Sweet Preservation for their cherries and trust in my ability to make them Cherry Happy.


Well this Cherry recipe had quite a great taste . It was like summer delight marries holiday cheer.

Ingredients

3 pounds cherries
1 lemon
1 tsp of ground cinnamon and 2/ 3 cinnamon pods
1 tablespoon of fresh ground ginger
4 cups of sugar


Clean, pit and cut your cherries in half. Now rinse them again. Chop your cherries to the consistency you like. We all know I love thick jam. When you are cooking them the skin will dissipate a bit. Watch for pit's. They do not float like citrus seeds.


Cut your lemon and squeeze the dickens out of it. I squeeze it right into the jam when cooking. Watch for seeds. 


Grind fresh ginger this gives it a great flavor. If you use powder use only 1 teaspoon.  Ginger is really simple to grind. Use a spoon to scrape the peel off then use a zester or cheese grater the smallest plate on the grater.


Cinnamon can be ground but for the easy way let us just use a teaspoon of already ground and some fresh cinnamon sticks.


Start you batch by putting your clean chopped cherries into a non-reactive pot and turn the flame on medium heat.


Add you ground ginger and powder cinnamon. Not the Sticks Yet!  Smash your cherries while they are cooking the juice is thick and dark. There are a few ways of doing this. You can mush or use an immersion blender while they are cooking. They do thin out while cooking no matter how you cut them.


Look at that beautiful juice in the pot. While the cherries are cooking down add your cinnamon sticks. Keep stirring.


The cinnamon sticks get added last because they get in the way. It does not take long for the flavor to come out of them.


By now you have your lemon, ginger and cinnamon added and have your jam going at a nice simmer. Time to add your sugar. Bring the jam mixture up to a rolling boil and add your sugar one cup at a time. Between cup's stir and let the sugar dissolve prior to adding another cup. Do this until all the sugar is added and then bring it back up to a rolling boil.


 Gel times differ if you use no pectin or pectin. No pectin needs to be brought up to a boiling point of 223 degrees. Pectin is to the boiling point. Here is a pectin not pectin link to help you if needed.


Now it is time to scrap the foam off and get to jarrin' up. Turn off the burner and let your jam sit for 5 minutes this helps the fruit not to float to the top of the jar once water-bathed. Scrap off the foam and have your jars ready.  Ladle into 1/2 pint jelly jars till 1/4" from the top of the jar. Wipe your jars clean and cap and water bath them for 12 minutes.


Take the jams out of the water bath and let them cool overnight. Once cooled take  the ring off wash and store in a cool spot. Your jam's will be good for 6 to 9 months. Once open put them in the refrigerator and enjoy.

Disclaimer: This is not an all inclusive recipe for making jam. You should have a basic knowledge and understanding of the canning process before proceeding. Please consult your local Center for Home Preservation for additional information and available classes.


10.15.2013

Grape Ginger Jelly


This Grape Jam came from the grape adventure my friend
Darcy took me on. We were able to pick all the grapes by hand.
When you have been preserving food for a while people start to give you a free pass to pick there fruits and vegetables ! Just remember to give them some of your goodies once canned!


I have so many grapes but in cooking and straining them down it was not quite as much. I made a Grape Strawberry Jam and a Grape Marmalade and now this one Grape Ginger Jam and I do know how much people love the ginger! I always get a large amount from the local farm and use it in so many ways. Candied Ginger is great for a Holiday gift giving.


Once I cooked them down I did get a fair amount
of fresh juice. I let my grape mixture cool down a bit and ran it through my Jelly Strainer.

My Jelly Strainer


Ingredient's

4 cups of fresh grape juice
1 cup chopped ginger
1/4 cup of lemon zest
4 tbs lemon juice
4  cups sugar


Alright start by putting your grape juice into a large pot.  Bring this to a boil and while it is getting there add your chopped ginger. Add your lemon juice.  Bring the grape juice and ginger mix to a rapid boil, stir- stir -stir.

You want this to come to a rapid boil that you can not stir down. Now add you sugar and bring it up to another rapid boil. Like all the jam's we make this jelly is no different we need to get it to the temperature for a good gel. the gel point of 222 degrees is the temperature we need .

Once you have reached the gel point you can turn the heat off let the mixture sit for about 5 minutes. Slowly and carefully scrap the foam off the top. Here is the Foam story

Alright now all that is left to do is fill those jars 1/4" from the top, wipe the rims, cap and water bath. Water bath for 15 minutes.

This makes about 8 half pints. Make sure you date and label with the name of the jelly you have in the jar's.

Disclaimer: This is not an all inclusive recipe for making jam. You should have a basic knowledge and understanding of the canning process before proceeding. Please consult your local Center for Home Preservation for additional information and available classes.