Showing posts with label banana. Show all posts

8.03.2025

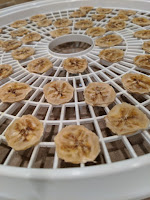
Homemade Dehydrated Banana Chips

 Bananas something I've always loved and there's so many ways to enjoy them. I can recall babysitting on Balboa Island in California and our daily walk included frozen bananas covered in chocolate and peanuts oh yeah

Dehydrating bananas is a wonderful and simple way to have them anytime as a snack. Super simple super easy let's go. 


You Begin by taking ripe bananas not overripe and not under ripe just plain ripe. Peel and slice your bananas in about a 1/4 " that's not too thick not too thin. **Please save your banana peels you can dehydrate those crush them and use them as fertilizer for all your plants indoors and out but that's another post.


Once you have sliced your bananas place them on to your dehydrating racks.

I have dried my banana chips on both plastic as well as metal racks. I would recommended once they have been dehydrated prior to them cooling off remove the chips. If not they will stick making it a pain in the bootee to remove from the rack.                                                                                                                                    


If you're using a dehydrator with a temperature and timer the temperature is 140 F and the timer should be set at 6 to 8 hours I just checked mine. If you have the dehydrator that has no temperature just blows air just keep an eye on him it takes a few hours.


Once finished make you sure you store them in a jar that has a Tight Seal so no air gets to them they will soften back up pretty fast. Just like any food that we preserve ourselves we want to keep it safe and away from any bacteria. 

Well enjoy your banana chips I know that depending on the banana they can be like a piece of candy or a well-dried banana that might not make sense but once you start doing it you'll understand. Leave any questions or concerns and have a blessed day blessed day.

10.10.2020

Dehydrated Bananas


I love Bananas ! Yup in a bowl of cereal, protein drink anytime snack and a bonus filled with lots of potassium. I love finding new ways to extend the life of my food. I am blessed with a yard that allows me to grow many of my food needed to preserve. 

Dehydrating Bananas you say ! I will once again never go with dehydrated store bought bananas again. The ones I made myself were scrumptious. Dehydrated they are so much sweeter than fresh. I think the whole dehydrating process brings out the sugar.


The one and only reason I did this was because I had three bananas left that looked like they may not make it to the protein drink. So I had been making Beef Jerky and dehydrated Roma Tomatoes all the tools were still out. So let us get started.

Begin by having all your tools and a few bananas. 


No need for a list but there is one thing. I didn't do and that was coat them in lemon. Do not get me wrong I love lemons. I dehydrate Lemons all the time to add to my water and any recipes. The reason people do soak them or coat them in lemon is to keep them from turning brown. Personally I do not care. Also if you look at my pictures you will see they really did not turn brown. Go figure! 


Alright have your cutting board and your dehydrator ready. I use a paring knife my favorite tool. Slice and put your slices on your dehydrator close but not touching each other. They will stick a bit but once your ready to tuen they lift off without breaking.


This is so fast. Ever dehydrator has different times and temperature. Mine is just blow and go.


No temperature just hot air and done. I am not a cook that depends too much on temperature and time with something a simple as this. 

Check your bananas if they are dry to the touch turn them over to dry the underside. They may stick a bit but take care to turn them and continue the drying.


Once you bananas are leathery and dry and sometimes a little sticky to the touch. 

You can store you bananas in an airtight container. They stay fresh for a good two weeks. 

Mine go in a bowl on the counter and they are gone within a few days. 


4.02.2015

Cranberry Banana Jam


Cranberry Banana Jam what the heck!
At first this combination of cranberry and banana seemed strange. I have never used banana's in any jam the only time I have used the banana is for banana bread. But there are so many recipes for this jam on the internet that I had to try it. Ok and I had a ton of cranberries from winter left in the freezer and I need room for Spring/Summer Berries.


So with that little story let us get started. I could have never imagined how delicious this jam would turn out. So simple and so very very delicious. Do make it.

Banana Tip : Here is one thing I would do and I did. Make sure your banana' are just about ripe enough to use for banana bread. This way there is no brown in the jam. I took some still ripe and froze them the reason is that this makes them super mushy when defrosted and still no brown.


Ingredients

5 cups fresh cranberries
2 mashed bananas
4 cups sugar
1/2 cup fresh squeezed orange juice
1/2 cup water
1/4 cup lemon juice
1 box of pectin (or not)


Put your whole cranberries with the liquid into your non-reactive pot and keep them on a slow simmer. You are waiting for them to start the popping sound which brings more liquid to the pot. You can squish them now but do keep some whole The whole cranberries look so pretty in the jars.


Now start to incorporate the mashed bananas and lemon. Once incorporated add your pectin if using. This jam does not need pectin it uses the banana as a thickening agent and the natural pectin in cranberries.  Start to add you sugar one cup at a time.  Look how beautiful the little pieces of banana and whole cranberries look.


Bring all the ingredients up to a rolling boil and keep stirring. You need a rolling boil that will not stir down. Notice how the sugar clear's the jam up and makes that nice gel look. Shiny sweet!


 While the jam is sitting for 5 minutes scrape the foam off. There is a lot of foam with this jam so scrape the foam prior to filling your jars.

 Ok have your jars ready to fill. Fill the jars with your jam leaving a 1/2 inch head-space.  Wipe clean, cap and twist. Now water-bath for 10 minutes.


This is crazy delicious and I already know next year this is going to be a big seller at the Holiday Boutique. Like the Tomato Jam last year.

Who'd a thought !


Disclaimer: This is not an all inclusive recipe for making jam. You should have a basic knowledge and understanding of the canning process before proceeding. Please consult your local Center for Home Preservation for additional information and available classes.