Showing posts with label marmalade. Show all posts

9.12.2019

Nectarine Marmalade


Nectarine Marmalade this recipe was quite an adventure in it's self. As most of you know I do a lot of investigating prior to getting any jam started. I go from book to book the internet and then to old reliable recipes from grandma.

This Nectarine Marmalade Recipe was not easy, most recipes only call out for juice of one lemon maybe a bit of orange. I like true marmalade's that means citrus vs. fruit in a jar. What taste comes out the winner is the palate decision. 


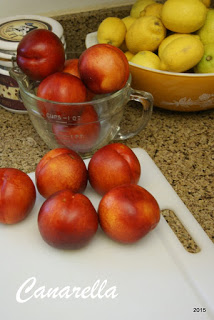
Yes these delicious little nectarines came to us from Washington Fruit Commission through their Sweet Preservation Site.


Ingredients for app. 7 half pints

8 cups of chopped nectarine
1  cup of thinly sliced lemon peel
1 cup of lemon pulp
1/2 cup fresh lemon juice
3 to 4 cups sugar (depends on your taste try it after 3 it does get pungent the longer it sits)

*Remember all jam you make becomes more flavorful once it has cooked and has sat in it's jar. ginger is a great example I use fresh ginger in my Blueberry Ginger Jam. By trial and error I have learned the right amount of taste not be taken away by the ginger monster.


Let's get our citrus ready now.

It is important to not skip this step.

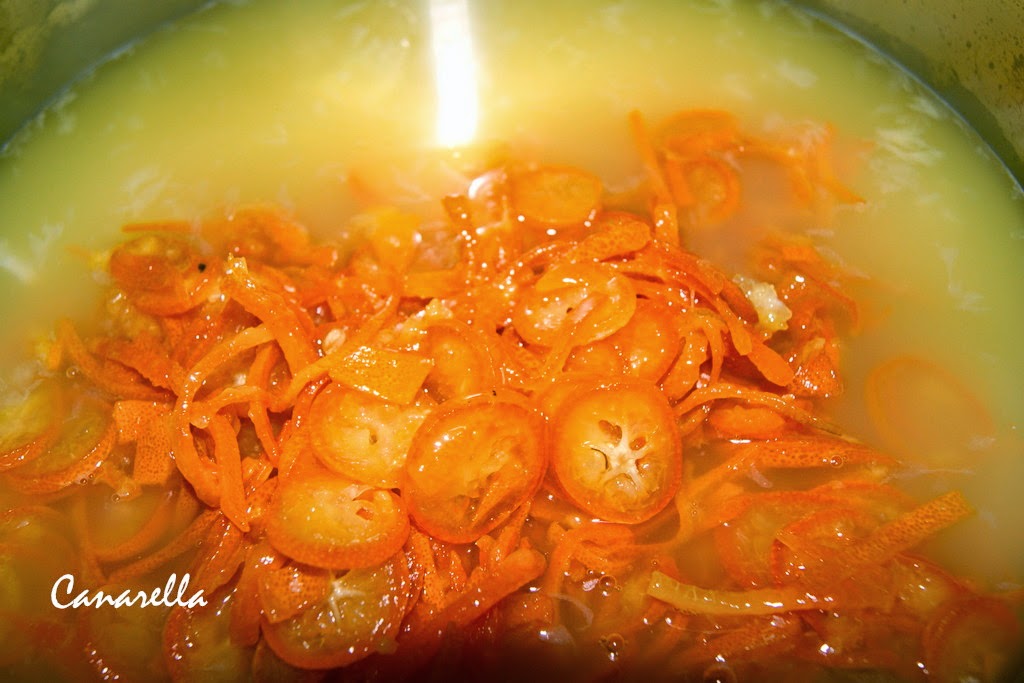
Now take the slices and cut them into quarters. Put the slices in 1/2 cup of the lemon juice bring this up to a simmer and then add the 1/4 tsp of baking soda. It will bubble. Turn it down and let it simmer on low for 20 minutes this tenderizes the rind's.


Have your cup of lemon pulp ready, It is super easy to get the rind out. I went to a class in Oakland at the Still Room and here is the link to tell you how to Section your Citrus.

Start your batch by putting your clean chopped nectarines into a non-reactive pot and turn the flame on medium heat.


Now add all your citrus and rinds. Smash your nectarines while they are cooking in the juice as it begins to thicken. There are a few ways of doing this. You can mush or use an immersion blender while they are cooking. They do thin out while cooking no matter how you cut them. And the nectarine skins dissipate.


Bring everything to a rapid boil and start to add your sugar one cup at a time. Between cup's stir and let the sugar dissolve prior to adding another cup. Do this until all the sugar is added and then bring it back up to a rolling boil.  

The perfect temperature for your jam to set is 222 degrees. 


With Marmalade the citrus has pectin in it naturally so if you bring it up to the proper gel point 222 degrees you will have perfect Marmalade set with your jam..


Scrape off the foam and have your jars ready.  Ladle into 1/2 pint jelly jars till 1/4" from the top of the jar. Wipe your jars clean and cap and water bath them for 12 minutes.


Take the jams out of the water bath and let them cool overnight. Once cooled take  the ring off wash and store in a cool spot. Your jam's will be good for 6 to 9 months. Once open put them in the refrigerator and enjoy.


Don't forget to label date and Jam 


Disclaimer: This is not an all inclusive recipe for making jam. You should have a basic knowledge and understanding of the canning process before proceeding. Please consult your local Center for Home Preservation for additional information and available classes.  

11.21.2016

Lime Marmalade

Lime Marmalade a Marmalade for the true Tart Heads. I have made Marmalade for many a year. I took a class in Oakland back in the day and it will forever have taught me that an expert is the best person to learn from. There are many who call themselves "Expert's" and many other names but I find that a person who is skilled in a type of canning is the best to learn from. I learned my Marmalade Techniques from June Taylor of the Still Room.


Lime Marmalade

3 cups lime pulp
1 cup of lemon pulp
1 lime and 1 lemon sliced thin 1 cup (total)
1 cup thinly sliced lime peel (not rinds or pith just peel)
¼ tsp baking soda
1 cup of lemon juice & 1 cup lime juice
(fresh squeezed its best but bottled will do)
1 cup of water
5 cups of sugar again to taste I like 4 but I like tart

Gel to the gel point of 223 degreez to gel.

The first step to do is get the rind cut this is the only way to do marmalade if you do not it does not have that little bit of tangy that real marmalade peeps love! Thinly slice the 1 lime and the 1 lemon. The rinds retain their pulp. It comes to about a cup or so give or take.

This step is important do not skip this step.


Now take the slices/peels and cut them into quarters. Put the slices/peels in 1 cup of the water and 1 cup of the lemon juice add the 1/8 tsp of baking soda and put it in a small pot bring it to a boil. Turn it down and let it simmer on low for 20 minutes this tenderizes the rind's.


Here is a link for sectioning your citrus. There is a trick and it makes this job much easier. I will section many a citrus to freeze for marmalade's and the like through out the year.


In the mean time cube up your limes and this is without the peel cut enough to have 4 cups of lime chunk's but like all my tips you make it the consistency you like after all its your jam.

Just do not change the measurements.

Limes are small and tricky but in the ends the flavor tells it all! 

Once the slices/peels have simmered add the rest of the liquid and the chunk's and the pectin
to your large stainless steel pot. Let all the ingredients simmer together and bring them up to a rapid boil you can not stir down. Have your thermometer in place. Keep stirring for 5 to 7 minutes then turn down to a low simmer.


This is my mixture getting ready to come to temperature.


Beautiful color ! 


The picture that I am putting up with the thermometer is from my lemon marmalade. When I make a large batch of marmalade I will also make a bag of pectin while cooking the Marmalade. I wanted you to have a picture of the thermometer I use.

Here the link to make your own pectin super easy and great way to waste nothing. It is all about the pith and seeds and left over citrus stuff!


Ok now back to the recipe. Bring this to a rapid boil it will begin to get a foam from the 5 to 7 minutes rapid simmer. Next step is to add the sugar slowly (Have your sugar measured out and ready) and make sure that your sugar is dissolved completely between each cup. Stir it over a gentle heat do not raise the heat to a boil until you are sure the sugar is dissolved.

Once it has returned to a rolling boil just to gel point that should be 223 on a thermometer.


When it is at it's roiling boil disturb it as little as possible. Do stir to prevent sticking on the bottom of the pot. When you are checking to see if your marmalade has reached it's gel point 223 and is setting then turn the boil down. You do not want to over cook it if you do you will have a dark, dry and rubbery marmalade.

Let your marmalade cool slightly this way (as with all fruit filled jams) when you jar it up it will make sure the peels and guts get distributed evenly through out your delicious marmalade. Ladle into jars leaving a 1/4" head space, wipe the rims, cap and water bath time.

Give them a bath 15 minutes is my standard time


This is a super one recipe.  You do not need to add boxed pectin, let me explain if you bring your marmalade up to a rolling boil with a candy thermometer to 223 you will get it to the right gel point but this takes practice.

This picture is of my Orange Marmalade I did not take one of the Lime Marmalade when I was jarring it up. So this is just an example of what it will look like.

Practice makes perfect Marmalade it is a time consuming Jam so be patient and do not give up!


Disclaimer: This is not an all inclusive recipe for making jam. You should have a basic knowledge and understanding of the canning process before proceeding. Please consult your local Center for Home Preservation for additional information and available classes. 

6.08.2016

Raspberry Marmalade


This last year was a great year for lemon's. I have a freezer full of lemon juice, lemon zest and lemon sections for marmalade. I then purchased these beautiful local raspberries. Out here we are blessed with very good berry business's locally. 


* Put a teaspoon and small saucer into the freezer for the gel test later.

Ingredients

6/8 cups raspberries app 2/3 pounds
2 cup of lemon pulp
1 thinly sliced lemon
3/4 cup of water
3/4 cup of lemon juice
1/8 of a teaspoon of baking soda
3 cups of sugar
juice of one lemon about a 1/3 cup


This will yield you 8 to 10  8 oz. jars of jam. It is a good idea to have all your ingredients cut and measured out prior to starting. This makes the jam making process so much easier. First thing to do is get your lemon slices and put them into a small saucepan with the water and lemon juice. Bring it up to a slow simmer and add the baking soda and keep on low for approximately 15 minutes or until your peels have softened.


If you want to learn how to cut and section your citrus go here. It is so easy to do once you get the hang of it.  Please do not be to picky the bit of rind and pith you may miss will add to the flavor and texture. Marmalade = tangy


While your lemon peels are getting ready you can place your raspberries and lemon pulp into your pot. I use a Copper Pot because it gives the even amount of heat for my jam making. I do large batches and the heat is extremely important for me to get the gel.


At this time you can smush your raspberries to the consistence you want. Be aware that they do cook down a lot when the heat hit's them. I wait until all the ingredients are in then stir this gives it just the right amount. After all it is a good thing to get a nice big raspberry on your toast.


Now add in your peels liquid and all. Bring the ingredients up to a rolling boil while stirring.


Your jam will start to change color and consistency. Keep this jam going until it reaches a temperature of 220 to 222. This is the key to the gel point with no pectin. If like me you have been canning a while you can tell when the jam has gelled. But for any beginner please use the spoon test.


Ok the jam should be ready for the jars. Turn off the heat and get your jar's ready to fill. Skim the foam off the top.Why do you get a bit of foam? Well like strawberries they have a bit of foam here is the rest of the story on that foam!


 Fill the jars to 1/4 inch from the top. Wipe the rims clean and cap them putting the screw band taunt onto the top. Give the jar's a 10 minute water bath. Once done remove and let them cool completely. Once cooled remove the bands, wipe clean and store in a cool dry spot. Label and date.


This is a Beautiful Jam !


Disclaimer: This is not an all inclusive recipe for making jam. You should have a basic knowledge and understanding of the canning process before proceeding. Please consult your local Agricultural Extension Service for additional information and available classes.


3.26.2015

Kumquat Marmalade

What a funny and delicious little fruit. Let me give you a few Kumquat facts. The fruit is delicious sweet yet tangy. This fruit resembles a miniature orangey-lemonish fruit.

A Kumquat tree resembles an olive tree when fruit is in season. They bare hundreds of oval shaped little fruit's. The inside is tender and tart with the skin holding all the sugar.

This is my first time making this marmalade and I did my studies with regards to the how to. With all the Marmalade recipes out there they are a dime a dozen. But one name stood out and I semi-followed David's recipe.

Remember have all your tools and fruit ready. This is a time consuming recipe so give yourself two day's. One to slice and soak the peel and your feet!  I say this because those little shit's fruit devils are needy.

I did spend a day telling Pa how " I was going to do it different and it was going to be so easy" NOT 


Wait come back don't run away it will be fine when you slather it on your toast with tea during Downton Abby. Oh ok enough let us get started. This will give you approximately 6 to 7 half pints.

Ingredients for Kumquat Marmalade

1 pound of kumquats
2 lemons
4 cups of water
1 cup fresh squeezed orange juice
2 cups of sugar

The first thing I want you to do is thinly slice your lemon's and place them with 1/2 cup cold water into your non-reactive pot. They should be covered. Simmer your peels for about 10 minutes on low. Do this while your still cutting the little kum's. Once the 10 minutes has past turn off the burner and let them sit.


Here are my many slicing pictures because there is a method. Here it is in a nut shell but look at the pictures.


 Cut off the Ends


Slice off the ends then small thin slices


**Save the pith & seeds for pectin**


Just below is what you should end up with.


Take the pot the lemon peels are in and toss the water but keep the peels.


Now add the kumquat peels and the lemon peels into the pot with the 4 cups of water. Why 4 you should have used the 1/2 to blanch the lemons. Take all your peels and put them into your Non-reactive Pot.


Time to make the pectin pack!


I do have a post on how to make your own pectin but rather than go there here is a quick reminder. When you chopped and peeled the citrus you should have saved the pith and seed's. This is natural pectin found in most citrus.


Pack up the stuff and tie your cheese cloth with some kitchen string.

Place the cheese cloth pouch into your pot.
Make sure the pouch is covered to cook the stuff well. Bring everything to a rolling boil, stir well and then shut it off. Remove the pot from the heat and let it sit covered over night. It is ok not to refrigerate!


Ok the next day which is today you need to return your pot to the stove. Add your sugar and orange juice and bring the mixture up to a rolling boil. Now turn the heat to medium and let it simmer for 30 minutes. Once the 30 minutes has passed remove the pectin pouch put it into a small bowl and let it cool.


 Look at that beautiful pectin !!!


Pour your pectin into the pot and bring the mixture up to a rolling boil and keep stirring until it get to the right temperature 220 to set.


 Remember to use your spoon and plate test for the set.

Once it has reached the gel point turn off the heat skim the foam.

Let your marmalade cool slightly this way when you jar it up it will make sure the peels and guts get distributed evenly throughout your delicious marmalade.


Ladle into jars leaving a 1/4" head space, wipe the rims, cap and water bath time.

Give them a bath 15 minutes is my standard time 


I hope you all will embrace Marmalade's the way I have in the last few years. Remember do not store your jars with the twist on. Take it off clean the rim make sure you have a good seal and label.


Disclaimer: This is not an all inclusive recipe for making jam. You should have a basic knowledge and understanding of the canning process before proceeding. Please consult your local Center for Home Preservation for additional information and available classes.     

2.05.2013

Homemade pectin or not


So making your own pectin this is something I learned how to do when I went to a class about Marmalade at June Taylor in Oakland.

It was a great class because she focuses on strictly citrus. Of all kinds.


I really enjoyed the class. The one thing I did not like was no Pictures. No shit good! But that did not deter me from trying this new lesson at home. Always have cheese cloth on hand as jam maker. It will come in handy with so many of your recipes. 


So to start you take the pith , guts and seeds and all things you do not want in your jam. Put this into the cheese cloth. I double up the cheese cloth and tie it with some cooking twine.
Do not use the yellow part of the peel this is good for other uses. Like candied Peels.


How much you use is a good question June used 500 pounds in her 30 quart pot's. LOL large batch. I thought I made large batches but this is large. Just use all the pith stuff you have from the recipe you are making it is all relative. For my Orange Marmalade I got about 4 cups of pith and seed.

 
So you drop you bag of pith and seeds into your pot of boiling jam. Let the pouch simmer with your jam. Marmalade is a boiling point jam which is another subject.


The real fun is waiting for the bag to cool so you can squeeze it. I have gotten myself a pair of heavy duty rubber gloves so as to not have to wait as long anymore.But just put the bag in the freezer for 5 minutes it cools right off.


Squeeze the dickens out of it.


 These last few pictures are for you to see what you get for your time. I will usually squeeze the pectin right into the pot of cooking jam. So moving on I need to say this is something that some will love to do and others will just pick up a box of pectin. I go either way.


Remember that doing things from "Scratch" is always time consuming and needs to be time tested to get the job done the way you like it. DIY can always be improved on and comments are always a great way to learn. I have had people comment and correct me plenty of times Thank Gosh they do!


This is the squeezed to death bag of stuff


And here is the cup of natural pectin I got out of it. I usually like I said squeeze right into the jam and bring it back up to the gel point. If at first you do not succeed try try again.
I do all the time. Oh yes you can. Here is a good site on how to do this process with apples. Here is a site that makes large batch citrus pectin and last but not least here is an old school 1930's article turned modern for you information from Florida.

9.26.2012

Onion Marmalade

 I got turned on to this onion marmalade when I attended my first food swap. the girl had it on her table and it was accompanied by some cheese and crackers. I do not think I left her table the whole swap.

I have a lot of pictures that I took when I first starting canning I noticed that I did not take them in the jar. But that is not holding me back from posting the recipe.
 I use the regular white onions because the amount of sugar you add makes them sweet enough. You can use any type you like for this recipe. The way I cut my onion is personal. I glove up when ever I am using garlic, jalapenos or onions. I do not want the smell on my hands and when I rub my eyes it is not a pleasant reminder I was canning that day.  I peel back the outer skin and use it for a kind of holder when I cut it see the picture. It works really.


Heat oil in a large skillet, add onions and cook until soft and translucent on medium high heat. Once softened, lower heat to medium or medium low, and add the brown sugar continue to cook onions until brown and caramelized. This will take a while.

 I fill up a pan with the sliced onions. Remember that no matter how full it looks it cooks down.


While that is cooking down in another pan Take the rinds (thin sliced lemon ) and add the water and baking soda bring to a boil then simmer for 5 minutes or so stirring it while it is a brewing.
Peels simmering

  Ingredients for Onion Marmalade

  1. 4 tablespoons olive oil
  2. 6 onions, large diced
  3. 1/2 cup brown sugar 
  4. 3 tablespoons of grated orange peel 
  5. 1/2 cup thinly sliced lemon peel 
  6. 3/4 cup water with 1/8 tsp of baking soda for peels 
  7. 3 cups granulated  sugar
  8. 1 cup unsweetened apple juice 
  9. 1/4 cup apple cider vinegar
  10. 1/2 cup finely chopped raisins or cranberries (adding this is a personal choice)
  11. 7 sprigs fresh rosemary, stems removed
  12. One box powder pectin = 6 tablespoons bulk pectin powder
  1. Heat oil in a large skillet, add onions and cook until soft and translucent on medium high heat.
  2. Once softened, lower heat to medium or medium low, add the brown sugar and continue to cook onions until brown and caramelized. If using raisin or cranberries add at this time. Caramelizing will take a while. During this time you can cook your peels in the water solution.
  3. Once caramelized add the  remaining ingredients and simmer on low to medium low stirring occasionally until the jam reaches the gel point.
  4. Pour hot jam into clean warm jars and boil in a water bath for 15 minutes. Let cool and store in a dark place.  App 6 to 8 half pints
brown sugar in

I promise that I will get pictures of this in jars next week.